Most of the Website testing tools prefer browser caching set with at least a one week expiration. Setting a browser cache expiration tells the visitor’s browser that is is okay to cache the content – so upon the next visit the browser will load the content from local cache rather than requesting it from the server again. That’s a big win on a couple different fronts
1. Page Load Speed. If the page, or at least parts of the page, are loaded from cache, that is always going to display faster than a round-trip to the server. And the faster the visitor’s browsing experience is, the better the overall experience and site impression will be. Site load time has shown to have a large impact on visitor interaction with web sites.
2. Bandwidth / Data Transfers. If the data is pulled from cache rather than the server, that obviously means less data being transferred. In a case where bandwidth is tracked and allocated on a monthly data transfer plan, this means less overall usage and potentially less costs for your hosting. This would be especially important in sites that are image-heavy like perhaps storefronts that show images of varying size and quality for their products.
3. Site / Server performance. If something is loaded from cache rather than from the server, that cuts down on the number of requests that the site needs to satisfy. Sure, even the smallest of servers can commonly handle hundreds if not thousands of concurrent visitors, but hey, why make it do all that work if it doesn’t need to? Imagine if your content is all cached and you have a 50% new vs returning visitor ratio… that means that your site load would potentially be cut in half, and the server could handle twice as many visitors before needing a resource upgrade.
We will learn how to enable Output Caching in IIS and set the expiration for the static content.
1. Access the IIS Manager on the server from Start –> All Programs –> Administrative Tools –> Internet Information Services (IIS) Manager.
2. Select the Server Hostname in IIS Manager and in the right frame, select Output caching.
3. Click on Add to add a cache rule.
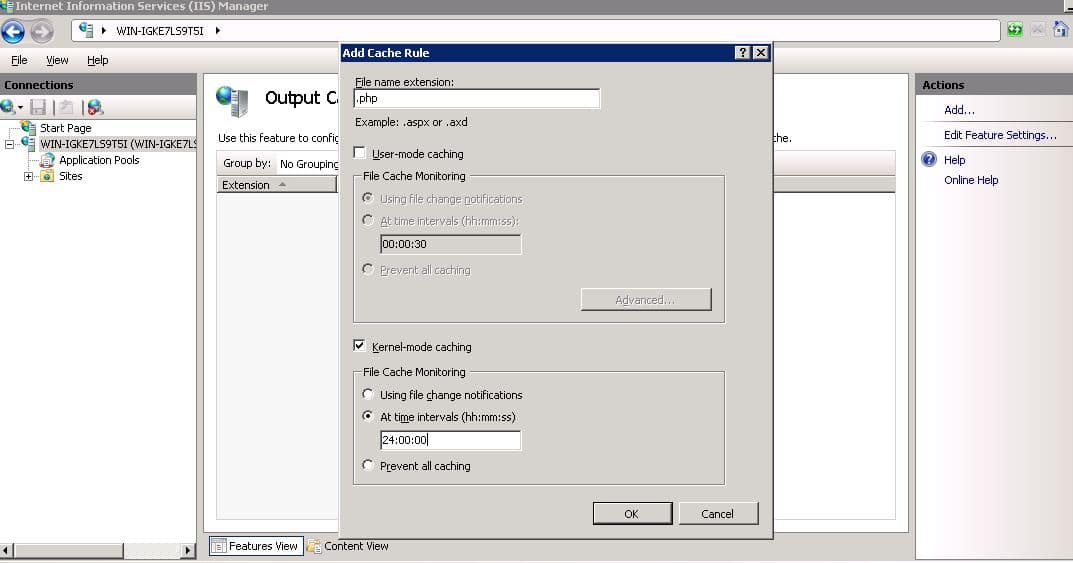
4. In the Add Cache Rule, enter the file extension to set the cache rule. For example, I will set .php which you can see in the following screenshot.
5. Select Kernel-mode caching. Enter the time interval for cache. I have set it to 24 hours which means the all .php files will be cached for 24 hours in the Kernel.
Simlarly, we can set output caching for individual websites/directories if we don’t want to set it at the global level.

Next, we will set expiration of the content cache in IIS.
1. Follow the steps listed above to access the IIS Manager.
2. Double click on the option HTTP Response Headers.
3. Click on Set Common Headers
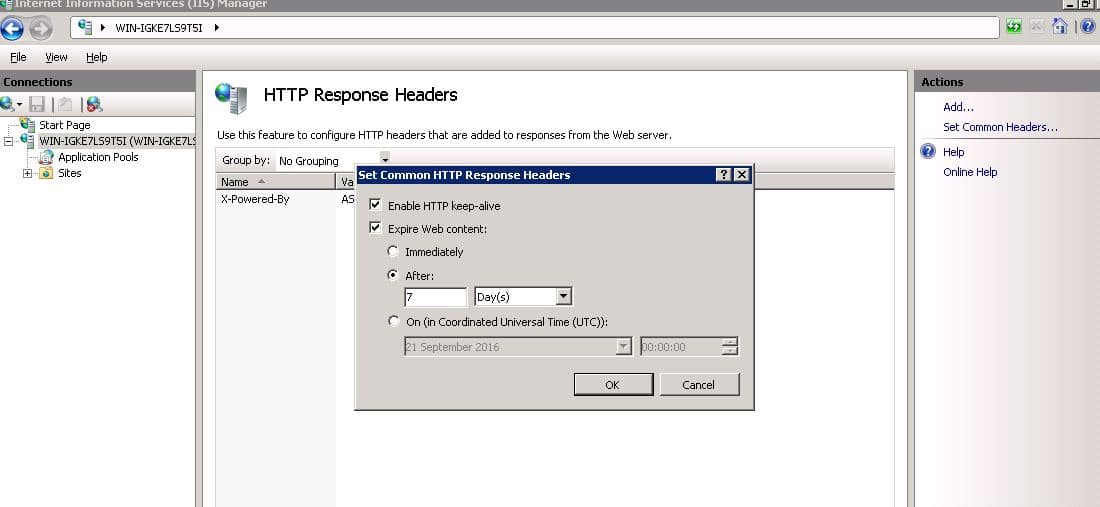
4. Select the option Expire Web Content. Make sure to keep the HTTP keep-alive enabled.
5. You can choose to expire the content immediately or set an interval to expire the cache.
6. I have selected 7 days which means the static content will be available in the cache for 7 days after which the browser will fetch the new content from the source. However, if the visitor chooses to clear his browser cache, the browser will try to fetch the content from the source irrespective of the expiration interval.
7. Click OK to save the settings and you’re all done!
You can similarly set the content expiration for individual sites/directories if you don’t want to set it at global level.

You can test your site using browser (IE or Chrome) developer tools to confirm the headers, or use an external testing site to confirm the caching.
